Mastering IoT Device SSH Download On AWS Ubuntu: The Ultimate Guide
Ever wondered how to seamlessly connect your IoT devices to AWS Ubuntu using SSH? Well, buckle up because we're diving deep into the world of IoT device SSH download on AWS Ubuntu. Whether you're a tech enthusiast, a developer, or just someone curious about modern tech solutions, this guide is for you. We'll break it down step by step, making sure you're not only informed but also equipped to handle this setup like a pro.
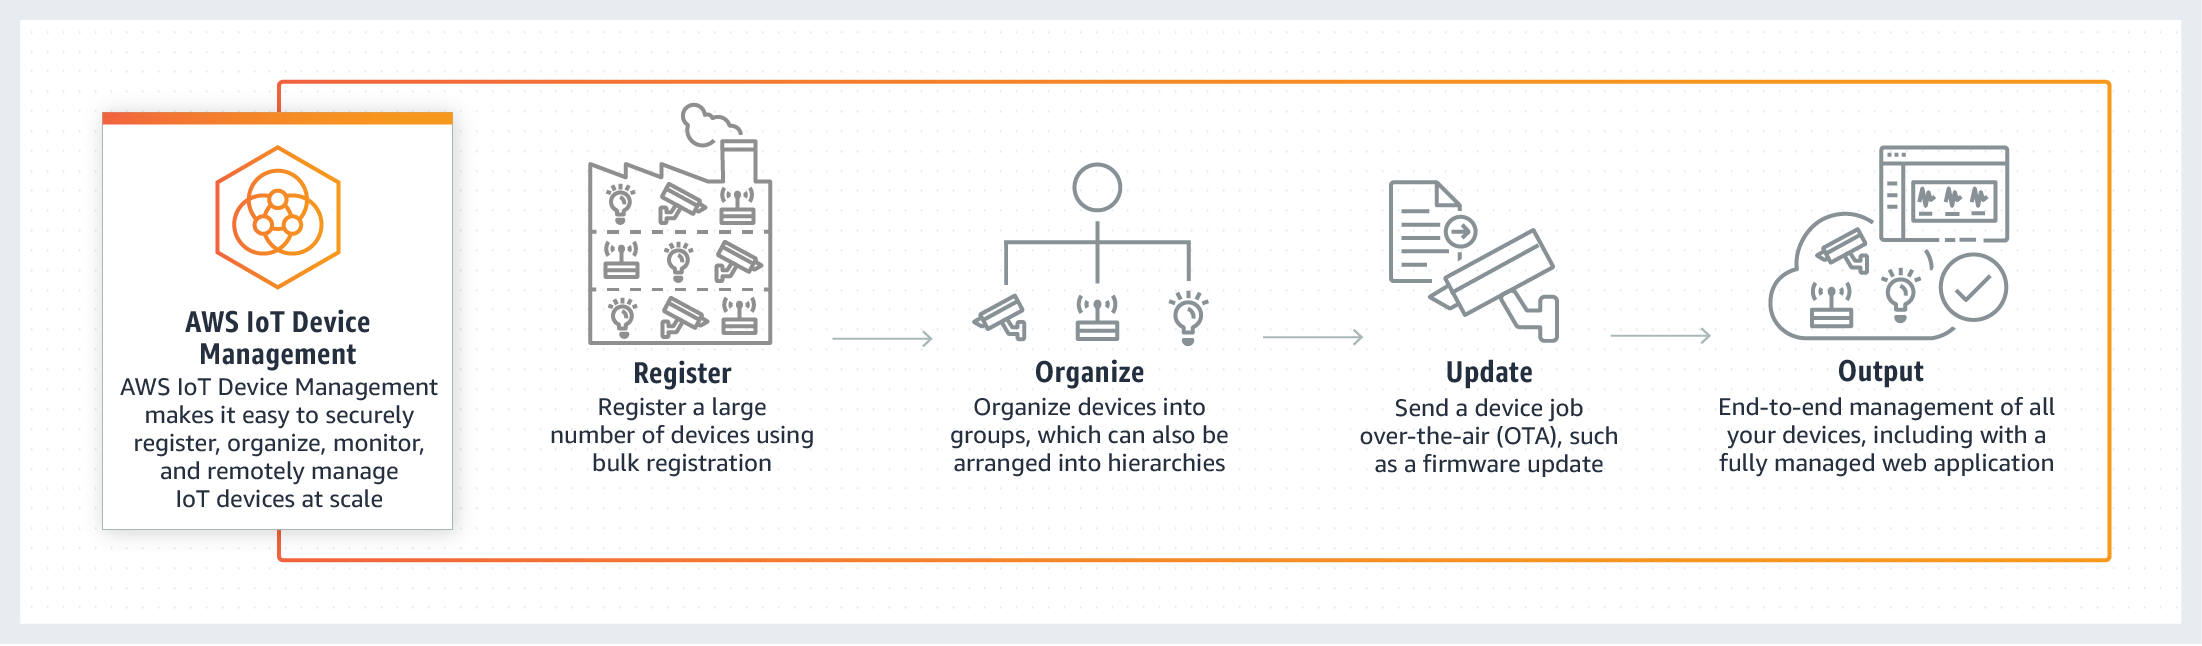
When it comes to IoT device management, SSH on AWS Ubuntu is like the golden ticket. It allows you to securely connect to your devices remotely, manage configurations, and troubleshoot issues without breaking a sweat. This isn't just about setting up a connection; it's about empowering you with the tools and knowledge to take control of your IoT ecosystem.
Before we dive into the nitty-gritty, let's set the stage. This guide isn't just another tech article filled with jargon. We're here to make sure you understand every step, from downloading the necessary files to setting up SSH on AWS Ubuntu. So, whether you're a seasoned pro or a beginner, there's something here for everyone. Let's get started!
Read also:Worlds Blackest Monkey Discovering The Rarest Primate On The Planet
Understanding IoT Device SSH: What It Really Means
Let's start with the basics. IoT Device SSH is essentially a secure way to connect to your Internet of Things devices via Secure Shell (SSH). It's like having a secret tunnel that lets you access your devices from anywhere in the world, as long as you have an internet connection. For those of you who are new to this, think of SSH as a secure line of communication between you and your IoT devices.
Why Choose SSH for IoT Devices?
SSH is not just any protocol; it's the go-to choice for secure communication in the tech world. Here are a few reasons why:
- Security: SSH encrypts all data between your device and the server, keeping your information safe from prying eyes.
- Reliability: With SSH, you can trust that your connection will remain stable, even over long distances.
- Flexibility: You can manage multiple IoT devices with ease, making it perfect for large-scale deployments.
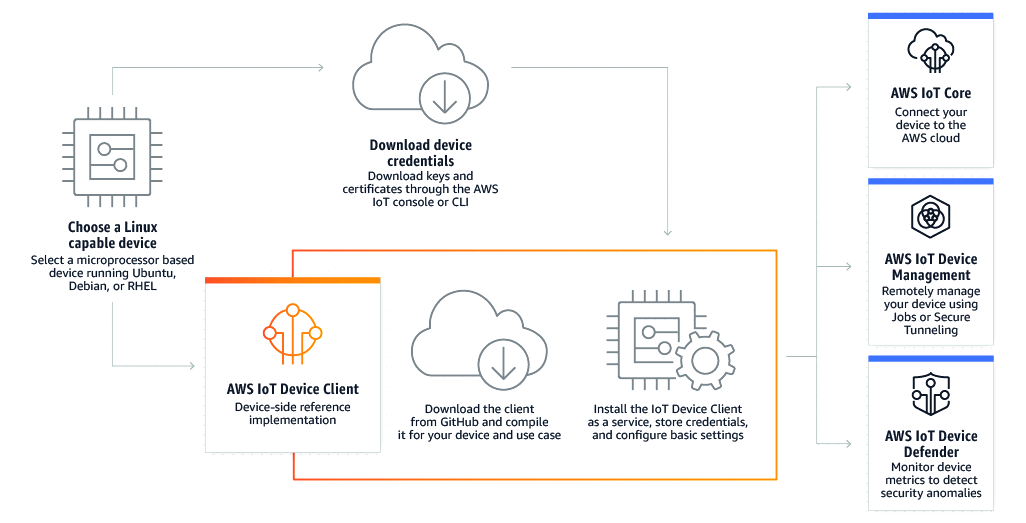
Setting Up AWS Ubuntu for IoT Device SSH
Now that we've covered the basics, let's talk about setting up AWS Ubuntu for your IoT device SSH. AWS Ubuntu is a powerful platform that provides the perfect environment for managing IoT devices. Here's how you can get started:
Step 1: Launch an AWS Ubuntu Instance
The first step is to launch an AWS Ubuntu instance. This might sound complicated, but trust me, it's not. Simply log into your AWS Management Console, navigate to the EC2 dashboard, and click on "Launch Instance." From there, select the Ubuntu Server AMI and follow the prompts to configure your instance.
Step 2: Configure Security Groups
Security is paramount when dealing with IoT devices. To ensure your SSH connection is secure, you need to configure your security groups. Allow inbound traffic on port 22 (the default SSH port) and make sure to restrict access to only necessary IP addresses.
Downloading IoT Device SSH Files on AWS Ubuntu
Once your AWS Ubuntu instance is up and running, it's time to download the necessary files for your IoT device SSH. This process involves a few key steps, but don't worry, we'll walk you through each one.
Read also:R34 Melody The Iconic Soundtrack That Defines A Generation
Step 1: Update Your System
Before downloading anything, it's a good idea to update your system. Run the following commands in your terminal:
sudo apt update && sudo apt upgrade -y
Step 2: Install OpenSSH Server
Next, you'll need to install the OpenSSH server. This is what allows you to establish SSH connections to your AWS Ubuntu instance. Use the following command:
sudo apt install openssh-server -y
Connecting IoT Devices via SSH on AWS Ubuntu
With everything set up, it's time to connect your IoT devices via SSH on AWS Ubuntu. This is where the magic happens. Follow these steps to establish a secure connection:
Step 1: Obtain Your Public IP Address
Before you can connect, you need to know the public IP address of your AWS Ubuntu instance. You can find this in the EC2 dashboard under the "Instances" section.
Step 2: Establish the SSH Connection
Now, open your terminal and use the following command to connect:
ssh ubuntu@
Replace
Best Practices for IoT Device SSH on AWS Ubuntu
While setting up IoT device SSH on AWS Ubuntu is straightforward, there are a few best practices you should keep in mind to ensure optimal performance and security:
- Use Strong Passwords: Always use strong, unique passwords for your SSH connections.
- Regular Updates: Keep your system and software up to date to protect against vulnerabilities.
- Limit Access: Restrict SSH access to only necessary IP addresses to minimize risk.
Common Issues and Troubleshooting
Even with the best setup, issues can arise. Here are a few common problems you might encounter and how to troubleshoot them:
Issue 1: Connection Refused
If you're unable to establish a connection, check your security group settings to ensure port 22 is open. Also, verify that your public IP address is correct.
Issue 2: Permission Denied
This usually happens if you're using the wrong key or password. Double-check your credentials and ensure you're using the correct user (in this case, "ubuntu").
Exploring Advanced Features
Once you've mastered the basics, it's time to explore some advanced features of IoT device SSH on AWS Ubuntu. These features can enhance your setup and provide even more functionality:
SSH Key-Based Authentication
Instead of using passwords, you can use SSH key-based authentication for added security. This involves generating a public-private key pair and configuring your AWS Ubuntu instance to accept the public key.
Data and Statistics: The Power of IoT on AWS
Did you know that by 2025, there will be over 75 billion IoT devices connected worldwide? That's a lot of devices, and managing them all can be a challenge. AWS Ubuntu provides the scalability and flexibility needed to handle such a massive IoT ecosystem. With SSH, you can ensure that each device is securely connected and managed.
Conclusion: Take Control of Your IoT Ecosystem
In conclusion, setting up IoT device SSH download on AWS Ubuntu is a powerful way to manage your IoT devices securely and efficiently. From launching your AWS Ubuntu instance to configuring SSH connections, each step is crucial in building a robust IoT ecosystem. Remember to follow best practices and keep your system updated to protect against potential threats.
Now that you've got the knowledge, it's time to take action. Try setting up your own IoT device SSH on AWS Ubuntu and see how it transforms your tech setup. Don't forget to share your experience in the comments below and check out our other guides for more tech insights!
Table of Contents
Article Recommendations